Thursday, 15 November 2018

EDAM Week 6 : Drawing Space and Light (3)

  In the  3rd and final session with Anne Teahan  on drawing  space and light   we were putting together  what we'd learnt  in the previous 2 classes in 1 large sustained drawing.   

 As a bit of homework  I'd done a quick trial   comparing  the usual   City Lit  heavyweight cartridge paper ( which is actually very good, it comes  from R K Burt ) with some Clairfontaine watercolour paper . I was wanting something with a bit more 'tooth ' to  hold the  charcoal  and liked the effect of the back  of the watercolour paper ( channeling my inner Seurat!)   But I found  a whole A1 sheet  was too stiff to roll up  for the class  so City Lit cartridge it was. 
The  easels  were already set up around a selection  of still life objects ( to which we contributed some items - spot my pewter pot!) , lit from 1 side to cast strong shadows. 
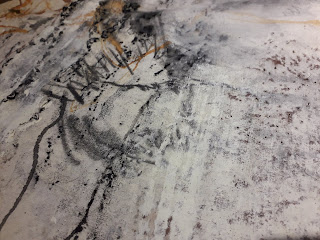
 The aim was to  build up a background  of space   with depth made up of many  ghostly layers of charcoal   marks  ( or with chalk fingerpints on black paper ) and then integrate  the objects and shadows. I'd liked how the organic lines had worked in the first week's drawing  ( above)  so wanted to do something similar . 


I got rather obsessed with my charcoaly hands and fingers last week  so decided to work again from my 'inky digit' photo,    drawing lines, rubbing them out,  until I had about 10  layers of marks.  Great fun!     


 I struggled  however with the drawing of the objects and shadows. When Anne came to  talk to me ,  she pointed out how static  and safe my observational drawing was  in comparison to the energy of the background  and suggested  I return to the drawings I'd done in the first week  based on Antony Gormley's 'Feeling Material' (below) 

 Much more satisfactory, using the overlapping spirals to describe the form, matching the marks in the background  and actually more of a 3D quality 

Then the  shadows changed with light pouring in from a window  and the paper just wouldn't take any more charcoal  and my  eraser was making no impression  introducing lights. Time to call a halt. 
 When we running out of steam , we looked through some slides of Ben Nicolson   works ( similar to those  below)   to get some ideas of how to integrate  backgrounds and objects  to create a cohesive whole. Some way to go in that regard! 


 At the end of the session when Anne looked  at my final piece  she said she'd hesitated whether to tell me to consider changing the way I was drawing  but I'm so glad she did!  It must  be difficult  for tutors who don't know the students that well  to gauge  whether a student is open to  taking on board criticism.  
 Sub-consciously, observational drawing  for me is  bound up with botanical/scientific  drawing as part of my job,  doing it  accurately , 'properly'.  Recognising the energy, liveliness   in my  process of 'just' mark -making, I feel like Anne has given me permission to apply that  to observational drawing too. I was a scientist but now I'm an artist. 


Monday, 12 November 2018

Mapping a Sense of Place: the role of chance


On the  course with Matthew Harris 'You are Here' in Puglia ,  how we responded  to our 'space' on our fabric pieces to a series of prompts  was chosen by throwing a dice. The  order of the tasks we completed in painting, stitching and manipulation our work were selected in the same way.

An interesting , liberating ( and sometimes frustrating) approach,   it both  took  the pain out of deciding what to do  while also taking you outside your comfort zone.   It meant that everyone was doing the same activities  but in completely different  orders ( good for  seeing how others had responded and steal their ideas! ) .  Would  my cloth would have turned out differently if  it had been done in a  different order? Very probably.

The 'Space' Prompts ( and the order I did them )
1( 5th)  Shadow
2 (6th) Line
3 (1st) Repetition
4  (4th) Touch/Feel
5 (3rd) Shape (+ve/-ve)
6 ( 2nd) Construct ( build)

Repetition 

  Repetition 

Repetition 

 My first  prompt was ' Repetition'   so taking my  cloth  to my space I took rubbings   in graphite of the markings on a  metal drain cover; drew oak leaves with the prickly pear orange ink;  used drops of Paynes grey ink to represent the  black moss  ( and folded the cloth to get a print while it was still wet) 
 My second prompt  was ' Construct'  - I found a piece of wood with holes in and  referencing the  mosses and lichens ,  placed acorn cups in the hollow and stuck the( rather fragile ) stalks  of the acorn cups in the holes. Although the idea was to do it in situ, I took it back with me afterwards  to the studio and added some more  but forgot to take a photo.  It did look like  spore capsules of a moss or  ' pixie cup' of a lichen. 
Shape ( positive/negative) 

 The 3rd  Prompt  I tackled was shape ( positive / negative)  , drawing the gaps between the stones on the wall  with crayon.
Touch/Feel 


I didn't spend  long in my space for 'Touch/ Feel'  where I took a rubbing of the oak bark  as appropriately enough , I  managed  to brush past a large clump of 'Spanish Needles' ( Bidens pilosa) and had 100's of the hooked seeds attached to my trousers and socks! I went back to my room to change - it took half an hour  to remove them.  Next time I went to my space I made very sure I went nowhere near them! 
Shadow

 I used  cuts in the cloth for 'Shadow' , the 5th prompt, around the outline of the drawing of the oak leaves I'd done for 'repetition' . As well as recording the  lines cast by actual leaves, the cuts themselves cast interesting marks below . 

While I was there , I took photos  and did a drawing for the last prompt 'Lines'  as I wanted to do this on the cloth in stitch  in the comfort of the studio (  particularly as my subject - the holes in a rock that made up lines  was also where I sat  to draw while in my space!) 


Lines on cloth : paint and stitch 


 The 'Tasks'  ( and the order I did them)
1 (6th) Lay down blocks of colour ( large/small; transparent/opaque) Obliterate/ knock back different area ( a mixture of white emulsion with a hint of yellow to march the calico was used for  this )
2 ( 1st) Select a small detail and work with it on a larger scale ( and vice versa)
3 (2nd) Manipulation (stitch/cut, distort, pleat, cut into surface
4 (4th)  In one area  work  back to front, +ve to -ve,  Try wax resist and layering  colour on top , use stitch as a resist
5 (3rd) Collage with found material, cloth/paper/bundles of threads/paper in response to information already there ( attach with stitch/binding, not glue)
6 (5th) draw or mark  with pure stitch , different scales .


After the first couple of   trips to my 'space' sometimes  I combined  the activity/prompt     with the task (  saved throwing the dice, reusing the same number). As time  went on and the layers accumulated, it becomes a bit tricky to remember what I did  and when!  But then  the process  became more about responding to the cloth  itself and making changes - I'll show the evolution of some areas in another post  but meanwhile , the photos below  show some of the ways I interpreted the 'tasks'. 

T1  Add Colour

 
T1 Obliterate 

 T2  Change scale, T3 Manipulate 

T4   Wax Resist 

T5 Collage 


T6 Stitch 


Thursday, 8 November 2018

EDAM Week 5: Drawing Space and Light (2)


 Week  5  of Extended Drawing  for Artists and Makers   started with a recap of the previous week  where  we'd been drawing  space, through transparency.  Anne  had brought in one of her fragile artworks to show us, made from strips  of paper , asking us to compare it  with the very solid brown teapot  it was based on. This week we were looking at surfaces and the  way light  bends around the surface  and the  awareness of the sense of touch 

Anne Teahan 


Antony Gormley 
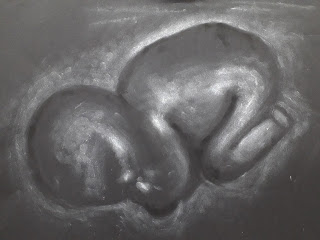
 We looked at 2 different art works  by  Antony Gormley  based on the human form with very different scales and approaches: ' Exposure' ( above ), a huge structure composed of space  and the small dense, dark,  form of 'Iron Baby'  cast from  his  daughter ( exhibited as part of 'Found' at the Foundling Museum)  
Antony Gormley 
Thinking of how you might  draw this sculpture, we looked at the drawings  of Georges Seurat  with their rich blacks of Conte  on  textured paper  built up of tone rather than line, his approach to curved surfaces.   (I rediscovered my 'World of Art' book on Seurat bought in 1980  when I got home - I've always preferred his drawings to his paintings) 
Georges Seurat 

Georges Seurat


Georges Seurat
In these portraits  by Chuck Close, he's used  clusters of fingerprints to create tone - using different pressures to create light and shade, using touch itself . 

Chuck Close
Chuck Close

So our drawing tasks for the morning  were  to draw from photo of  'Iron Baby'  with white chalk on black paper and  charcoal  on white paper   working directly  with our fingers and hands , feeling our way around the subject , working lightly to begin with.   
 We  set up a 'palette' on the corner of   the paper, rubbing the white chalk to create a  dense covering which we lifted off with fingers to draw/ smear on the paper, replenishing when  needed,  creating a tonal scale with white fingerprints down the edge.  Working outwards ,we  used an eraser  to remove some of the chalk marks, to  define shapes and lines ( trying to avoid using the chalk directly until working  on  the strongest  highlights)  
Introducing the  dense , velvety blacks of compressed charcoal was left to the end , using the same technique of  rubbing on the corner of the paper for a palette  and then applying fingerstrokes in the  very darkest parts of form 


 We then  repeated  the process  in reverse, using  willow charcoal  initially  before the compressed charcoal.   The results  were much better  ( and more interesting)  with white on black than black on white , partly because the subject was dark so didn't need as much of the chalk to  find and define  the form ( neither of the papers had much a  'tooth' to hold the pigment.), partly as  I was looking intently just at the areas of reflected light rather than the subject matter. It was quite magical gradually seeing the 'ghost' emerge, the trick was to put a bit more definition in certain areas - the fist, the line along the back 

 Having said I don't really like charcoal to draw with as it's messy  and dries out my skin, I rather went for it, with a bit of encouragement using the side of my hand to draw with ! I rather like the smudged  overlapping lines and marks   that you couldn't get any other way. 
 I couldn't resist taking   'selfies' of my hand ( but then I  have  used my 'inky digit'
 as inspiration, including the piece above for 'International Threads' )    

I then found   the work of Judith Ann Braun


Judith Ann Braun 

In the afternoon   we applied some of the techniques  to the  shiny black vessels or objects  we'd brought in ( in my case a coffee filter cone) , starting with charcoal on white paper 


'Spaceship Caffeine'
 ' Nul Points'  for  perspective  and elipses but  I had a wonderful time putting in the lines with the side of my hand  and some energetic mark making with my fingertips and an eraser.   I like   how the  history of  corrections  and  redrawing   adds to the richness if not the accuracy  

I  didn't have much time  for  doing the  white on black version  ( especially after all the hand washing to remove at least some of the charcoal) - a bit more accurate,  a lot less lively.

Next week  we're doing   one A1 drawing based on the combination of space ( transparency) and light( surfaces, touch). Lots to think about!