Showing posts with label indigo boro. Show all posts

Saturday, 18 August 2018

CQ Journal Quilts May to August : Indigo boro

Indigoboro JQ detail 
 My Journal Quilts  this year   are  based around scraps : January to April involved using the offcuts from my own quilts; for May to August  I've been excavating sections of old tatty quilt  which I've recently overdyed in indigo.  I'd  already started  cutting through layers and stitching some of them  them before  dyeing . It's difficult to know how far to go both in revealing the different fabrics and in stitching  but its a fascinating process. Perhaps I need to do a  video  next time!
MRamsay_May18_Indigoboro1
This one I started stitching at Rydal but put to one side.  This was the most disappointing as it took the indigo very evenly , I preferred the original colours (below)) 
  I did have  fun trying to remember how to buttonhole stitch around the holes. It was also a reminder about how difficult it can be to take decent photos of indigo , getting the colour right.  
Indigoboro1 detail
MRamsay_ June18_ Indigoboro2 
This section had already disintegrated and didn't need much cutting back through the layers. The layers of brown wool did not take  up so much of the indigo as the cotton fabrics.   I discovered some sashiko threads I've had for a while   but I think I rather overdid it....  
Indigoboro2 detail

MRamsay_July18_Indigoboro3

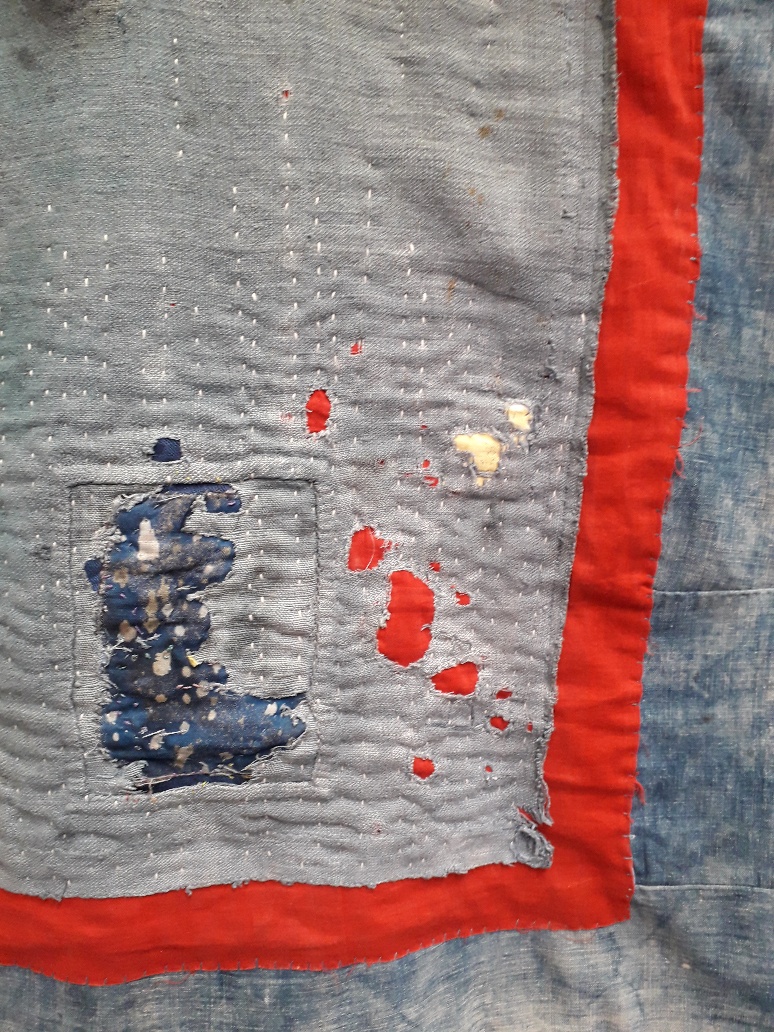
 Section from a different quilt . It was filthy when I bought it and after going through the washing machine, a lot of the fabrics disintegrated ( had to clean out the  filter on the machine!). The red patches in particular had disappeared apart from the seam allowances.  After dipping in indigo , learning from the previous JQ, I added just enough stitch to emphasise the shapes ( it was already heavily quilted)  
Indigoboro3 detail 
MRamsay_Aug18_Indigoboro4 
My favourite. I liked the different stripes in this section of quilt and as it was dyed towards the end  of the session, the indigo wasn't that  strong. I started by stitching  either side of the creases to emphasise them  and tried a range of stitches: couching; buttonhole; chain stitch and in the triangle  experimented with  leaving loops in the thread
Indigoboro 4 detail 
After these  small trials, I've now got more confidence to start working a bit larger ( and probably doing something different for the next  set of JQ's while still using scraps ) 

Friday, 17 August 2018

Festival of Quilts 2018: Indigo

 The quilts that fed my  soul at Festival of Quilts were those in the gallery  of Shizuko Kuroha  with their subtle , masterly use of  antique indigo-dyed  textiles. Deceptively  simple from a distance, they were breathtaking  in their detail


 In the  style of Japanese Boro,  I liked  the piece by Caroline  Ramsey  in the Fine Art Quilt Masters.  I heard  that several people  thought she might be my sister , or relative, with our shared  surname ( actually   mines the Scottish one , RamsAy) and love of old quilts! 


My purchases    included fabrics  from Jo Lovelock ( which Ian bought me ) various threads, some  new designs of indigo and kola   from the African Fabric shop. A while ago  I gave Magie  a piece of the Japanese indigo and persimmon  shibori I'd used in my 'Fleet Mudflats ' quilt  and she took it out to show Musa to see if  he could copy the   technique. Coincidentally ,  looking at local indigo designs in a museum , Magie found   the same pattern ' Chuti, Chuti' 

I bought some lovely  bits of tattered and darned antique  indigo and hemp  from Sallie Ead to combine with my indigo dyed tea towels


  The afternoon before we  headed up to FoQ , Sue helped me wind 8  cards of thread from a large hank of silk dyed several years ago .  It got very tangled at times , definitely a 2 person job. 

And  Robbie  took delivery of my  indigo thread 'nest' and patiently unravelled it!  It was very neatly done as you  might imagine when you see   her  exquisite  work
Roberta Le Poidevin  Little House #3 


Wednesday, 25 July 2018

Indigo Dyeing In Deal


Its been 4 years since I did any indigo dyeing   and  without an outside drain in the garden  at our new house , I wasn't sure when I'd get the opportunity to do it again.  So when Glenys from CQ  Kent group  offered to host  an indigo session at her house in Deal while her husband was  away  for a week, I invited myself to stay for a night so we could have 2 days playing  and invited  other group members to join us!  


 The previous  week Glenys picked up all the kit I had stored in our garage ,  I had some new pipes cut  for pole wrapping (which Ian  gamely carried home!)  and I hurriedly put together a requirements list and suggestions  for  what to make in advance including  presewn 'socks' .  


  Glenys met me at the station on the first day   and  we spent the morning setting up  the vats ( with some recalculations required as the markings on the measuring jug weren't easy to read   and I made up   my large blue vessel with too weak a solution!) .  Glenys's facilities  are excellent - a large garage with sinks with hot and cold water  and a large gravelled area  for setting up drying racks. 

After lunch,   Jan, Barbara and Stella arrived and were soon busy in the sun  preparing samples.   It all got rather exciting  as we put  items into  warm  water to soak and then  dunked them carefully in the vats ( poles in the large blue vessel, smaller items in the bucket.) It was lovely to introduce indigo novices to the magic of seeing fabrics turn from yellow to green to blue as they oxidised.  It's a quick process compared to procion dyeing  so we soon had rackfuls of beautiful  cloth to admire. 


With a break for afternoon tea and cake in the shade of a large tree ( it was very hot)  we continued  dyeing until about 5 when were  exhausted   and  J, B and S went   home with their treasures to rinse and wash. After covering over the vats with cling film  and  getting cleaned up ,  Glenys and I went   down to the shore to the  Royal Hotel  for  a well deserved dinner and glass of wine.  

 The next day  was  grey and  overcast ( a big contrast to the  strong sun the day before)  , even some light rain at times, so Glenys and I retreated to the garage.  After ' sharpening' the vats with more hydros ( and transferring  some of the contents of my tall blue vessel into  a bucket ) we spent most of the morning preparing items  for dyeing, including trying some different techniques  there hadn't been time for the day before ( 'donut's' and wrapping around ridged hosing) .  I concentrated on 'scrunching' bits of old quilt in net bags secured with  clips. We then had combined morning coffee and lunch  before the dipping began.   The dye was definately beginning to weaken towards the end of the afternoon - time to pack up


Parcels  waiting to oxidise. 

Glenys unwrapping 


Clearing  and  packing up took a while  and then Glenys took me and the kit home and as it was raining (!)  I set up my wet items on the  balcony airer in  my garage  ( no sinks here, it doesn't even have any light) which left nice marks on the concrete! The following day I  set up the airer in the garden to dry properly . 

On Monday the grand rinsing and  washing session began! We might not have an outside drain but we do have a tap  and I set up the 'painting easel  chairs'  with large trugs for rinsing , the water going on the garden afterwards. Rinsing in cold water is usually my least preferred  part of the process but it was surprisingly enjoyable given the  heat! 
I split my dyed fabric into 2 loads for rinsing and washing ( pole wrapped  and French tea towels above, old  quilts  below)


  I'll share my favourites  in another post   but I was generally very happy with the results and  thanks to Glenys  we had a very enjoyable  and productive session.